How often do you feel like your dinners are just on repeat and are boring the heck out of you and your family? Often it is hard to think of new ideas……especially at the end of a long day. Sometimes a good way to venture your mind to the unknown is to think of items that you have ordered at a restaurant, seen on a menu, or a cooking show. We were sick of the same old thing and wanted to venture out and try something new……so we made a salad that was different than our usual spinach and veggies.
This meal was seriously easy. The only thing it did was dirty a few more dishes than normal…..but that is okay when the end result is a delicious meal!!
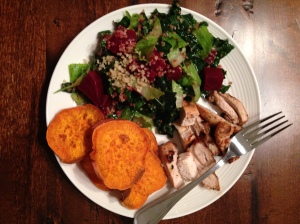
Beets, Quinoa & Kale Salad
Ingredients:
Kale
Romaine (or other lettuce for mixing)
Bunch of Beets
1 Cup Quinoa
Balsamic Dressing *Recipe Below
Directions:
Wash and cut the kale and romaine into bite sized pieces. To make the kale softer you can wash it and cut it up, then toss it with some coarse salt. Rub the salt into the leaves and it will soften them slightly.
Peel and chop up the beets. Boil the beets for about 20 minutes over medium-low heat. You can test the beets for readiness by trying to poke them with a fork. If you can easily, then they are fully cooked.
Bring quinoa to a boil. 1 cup of Quinoa and 2 cups of Chicken Broth. Bring to a boil, cover and reduce heat to simmer for 15 minutes.
Now, once everything is cooked it is time to toss. In a bowl put your kale and romaine, spoon in some quinoa, beets and balsamic dressing. Slowly add in beets and quinoa so that the proportions are to your desire.
ENJOY! It is truly an amazing salad!!!
Balsamic Vinaigrette Dressing
Ingredients:
Olive Oil
Balsamic Vinegar
1 Clove Garlic
Oregano
Pepper
Salt
Directions:
Pour in Olive Oil and Balsamic Vinegar in a 3:1 portion. So it you use 3/4 cup of olive oil you would use 1/4 cup of balsamic. Chop/Mince up 1 large clove of garlic and add it. Crush in ground black pepper and salt to taste. I use just a little salt and more pepper…but truly alter this to what you prefer. Shack in some oregano and shake it up. Let it sit for roughly 15 minutes before using. It is best to give it some time for the flavors to combine.
Grilled Chicken
Ingredients:
2 Chicken Breasts
4 Chicken Thighs (boneless-skinless)
Olive Oil
Fresh Lemon
Pepper
Salt
Paprika
Directions:
Mix together some olive oil, the juice of a lemon and the remaining seasonings to taste. I use lots of pepper and paprika and just a touch of salt. Sautee the chicken in the marinade for about 20 minutes before grilling.
I will not tell you how to grill….but the breasts over direct heat and the thighs off the direct heat it takes about 20 minutes to grill them up to perfection 😉

Sweet Potatoes
Ingredients:
1 Large Sweet Potato
Olive Oil
Chili Powder
Salt
Pepper
Directions:
Preheat oven to 375*. Line a baking sheet with aluminum foil.
Chop the sweet potato in either chip like slices or fry slices. Mix with some olive oil until the sweet potatoes are coated. Sprinkle with minimal salt, pepper and chili powder and toss. Place the sweet potato slices out on baking dish so that none are overlapping. Bake for 20 minutes then flip and bake for an additional 20 minutes. The cook time will depend on how thick you slice the sweet potato. Check on them at the 15 minute mark to ensure they are not burning. If they are already browned, flip them and watch them on the other side as well.
I hope you enjoy this delicious, easy, nutritious meal as much as we did!
#ourprimallife #beetrecipes #saladrecipes #kale #eatinghealthyathome

 First I must say….the beef jerky is DELICIOUS!!! I was so surprised at how simple the whole process is, and how delicious the end result turned out. Why would you ever spend the outrageous money on packaged beef jerky when you can make your own!?!? I am sold for life – on making our own beef jerky. No preservatives, you know the cut of meat, you know the source of meat, you know the spices, etc……I mean, it is a no brainer. If you missed the first part of the post, here it is for you:


